Sliding puzzles are mechanical devices made of blocks of wood or plastic set into a frame as well as simple but addictive computer games that improve your problem-solving skills. The pieces are usually simple shapes or imprinted with colors, patterns, sections of a bigger picture, numbers, or letters. Sliding puzzles, also known as sliders or sliding-block puzzles, are different from rearrangement puzzles in that the pieces cannot be lifted or removed from the frame. To win, you have to arrange them in a specific pattern by sliding them into certain routes on the board. Each move opens a new path and rearranges the pieces, so you have to plan carefully in order to achieve the end configuration.
Following this tutorial, you will make your own 3×3 sliding puzzle using Java.

Note: To create the game, you can use more advanced implementations like arrays and matrices. The method used in this tutorial is simple and targets absolute beginners.
Let’s begin.
Before You Start
For the user interface, you use Swing. Swing is a GUI (Graphical User Interface) widget toolkit for Java. It is built on top of the AWT (Abstract Windowing Toolkit) API. Unlike AWT, Java Swing provides platform-independent and lightweight components.
The javax.swing package provides classes for the Java Swing API such as JButton, JTextField, JLabel, JMenu, etc. You will use the Main method to start the program, but the programming logic will be written in a separate class.
Preparing Variables
Create a new project and give it a descriptive and meaningful name.
Your Main method should look like this:
					public class Main {
   public static void main(String[] args){
       new Puzzle();
   }
}
Right-click on your project folder and create a new Java class – Puzzle. To use the functionalities (methods) of Swing, the class should extend JFrame. To make certain actions happen when you click on the puzzle pieces, you also need an event listener. Make the class implement ActionListener.
					import java.awt.*;
import javax.swing.*;
import java.awt.event.*;
public class Puzzle extends JFrame implements ActionListener{
}
Your puzzle will be 3×3 so you need to declare 9 buttons for each of the puzzle pieces, as well as a shuffle button to rearrange them. You can also implement a counter for the number of clicks the user has performed. To make the counter, you need an integer and a label to visualize the number.
					JButton b1,b2,b3,b4,b5,b6,b7,b8,b9,shuffle;
int counter = 0;
JLabel counterLabel;
Creating Constructor
When you start the game, the first thing you will see is a new game window. Let’s set it up. Because the Puzzle class inherits (extends) from JFrame, it can call JFrame methods like setSize() and add(element).
					Puzzle(){
   setSize(400,400);
   setLayout(null);
   setVisible(true);
   setDefaultCloseOperation(JFrame.EXIT_ON_CLOSE);
It is 400×400 pixels in size (which you can customize to your preference) and will close when you click the X button on the top right.
Next, you need to initialize all the elements.
					b1 = new JButton("1");
b2 = new JButton(" ");
b3 = new JButton("3");
b4 = new JButton("4");
b5 = new JButton("5");
b6 = new JButton("6");
b7 = new JButton("7");
b8 = new JButton("8");
b9 = new JButton("2");
shuffle = new JButton("Shuffle!");
counterLabel = new JLabel("Clicks: 0");
Then add these elements to the window and set proper bounds.
					add(b1);add(b2);add(b3);add(b4);add(b5);add(b6);add(b7);add(b8);add(b9); add(shuffle);
Container contentPane = this.getContentPane();
contentPane.add(counterLabel);

b1.setBounds(90,60,50,40);
b2.setBounds(160,60,50,40);
b3.setBounds(230,60,50,40);
b4.setBounds(90,115,50,40);
b5.setBounds(160,115,50,40);
b6.setBounds(230,115,50,40);
b7.setBounds(90,170,50,40);
b8.setBounds(160,170,50,40);
b9.setBounds(230,170,50,40);
shuffle.setBounds(135,245,100,40);
counterLabel.setBounds(145,15,180,40);
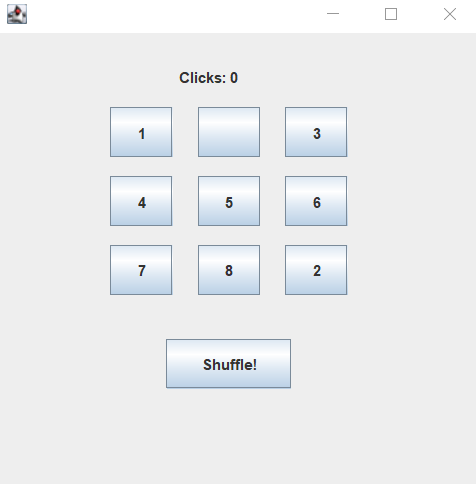
Now run the program. It should look like this:
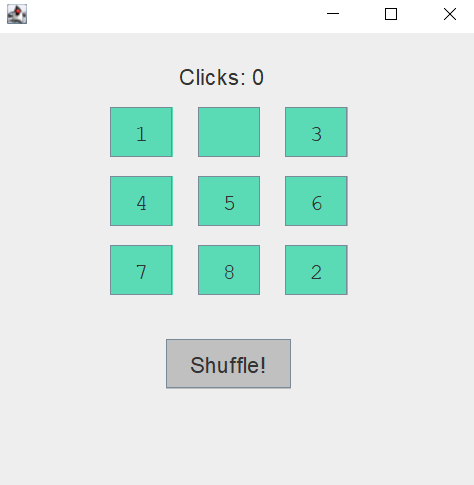
The next step is optional, but it will improve the visual appeal of your game. It involves changing the background color of the puzzle pieces, the font, and the font size. You can select your own or use the ones from this example.
					shuffle.setBackground(Color.LIGHT_GRAY);

b1.setBackground(Color.decode("#5adbb5"));
b2.setBackground(Color.decode("#5adbb5"));
b3.setBackground(Color.decode("#5adbb5"));
b4.setBackground(Color.decode("#5adbb5"));
b5.setBackground(Color.decode("#5adbb5"));
b6.setBackground(Color.decode("#5adbb5"));
b7.setBackground(Color.decode("#5adbb5"));
b8.setBackground(Color.decode("#5adbb5"));
b9.setBackground(Color.decode("#5adbb5"));

b1.setFont(new Font(Font.MONOSPACED, Font.PLAIN, 18));
b2.setFont(new Font(Font.MONOSPACED, Font.PLAIN, 18));
b3.setFont(new Font(Font.MONOSPACED, Font.PLAIN, 18));
b4.setFont(new Font(Font.MONOSPACED, Font.PLAIN, 18));
b5.setFont(new Font(Font.MONOSPACED, Font.PLAIN, 18));
b6.setFont(new Font(Font.MONOSPACED, Font.PLAIN, 18));
b7.setFont(new Font(Font.MONOSPACED, Font.PLAIN, 18));
b8.setFont(new Font(Font.MONOSPACED, Font.PLAIN, 18));
b9.setFont(new Font(Font.MONOSPACED, Font.PLAIN, 18));
shuffle.setFont(new Font(Font.DIALOG, Font.PLAIN, 18));
counterLabel.setFont(new Font(Font.DIALOG, Font.PLAIN, 18));
In the end, you get:
Finally, attach an action listener to every button:
					b1.addActionListener(this);
b2.addActionListener(this);
b3.addActionListener(this);
b4.addActionListener(this);
b5.addActionListener(this);
b6.addActionListener(this);
b7.addActionListener(this);
b8.addActionListener(this);
b9.addActionListener(this);
shuffle.addActionListener(this);
}
And the Puzzle constructor is done.
Adding Action
The Action Listener is a simple event handler with only one method – actionPerformed (ActionEvent e). It is used to define what should happen when a user performs a certain operation. It registers the event of clicking a button, for example. The ActionListener is one for all buttons, so you have to make a separate if statement for each one of them in the actionPerformed method. Let’s start with the Shuffle button.
					public void actionPerformed(ActionEvent e){
   if(e.getSource() == shuffle){
       String s = b4.getText();
       b4.setText(b9.getText());
       b9.setText(s);
       s = b1.getText();
       b1.setText(b5.getText());
       b5.setText(s);
       s = b2.getText();
       b2.setText(b7.getText());
       b7.setText(s);
       counter = -1;
       counterLabel.setText("Clicks: 0");
   }
The logic of moving puzzle pieces is simple: instead of physically moving the pieces around the board, you simply change their text.
					if(e.getSource() == b1){
   String s = b1.getText();
   if(b2.getText().equals(" ")){ b2.setText(s); b1.setText(" ");}
   else if(b4.getText().equals(" ")){ b4.setText(s); b1.setText(" ");}
}
Let’s break the process into a few steps:
- Extract the text from the current button;
- Determine which of the adjacent buttons has no text;
- Substitute the empty text with the extracted one;
- Set the text of the current button to an empty string.
Follow this logic for the other pieces as well.
					if(e.getSource() == b2){
   String s=b2.getText();
   if(b1.getText().equals(" ")){ b1.setText(s); b2.setText(" ");}
   else if(b3.getText().equals(" ")){ b3.setText(s); b2.setText(" ");}
   else if(b5.getText().equals(" ")){ b5.setText(s); b2.setText(" ");}
}
if(e.getSource() == b3){
   String s=b3.getText();
   if(b2.getText().equals(" ")){ b2.setText(s); b3.setText(" ");}
   else if(b6.getText().equals(" ")){ b6.setText(s); b3.setText(" ");}
}
if(e.getSource() == b4){
   String s=b4.getText();
   if(b1.getText().equals(" ")){ b1.setText(s); b4.setText(" ");}
   else if(b7.getText().equals(" ")){ b7.setText(s); b4.setText(" ");}
   else if(b5.getText().equals(" ")){ b5.setText(s); b4.setText(" ");}
}
if(e.getSource() == b5){
   String s=b5.getText();
   if(b2.getText().equals(" ")){ b2.setText(s); b5.setText(" ");}
   else if(b4.getText().equals(" ")){ b4.setText(s); b5.setText(" ");}
   else if(b6.getText().equals(" ")){ b6.setText(s); b5.setText(" ");}
   else if(b8.getText().equals(" ")){ b8.setText(s); b5.setText(" ");}
}
if(e.getSource() == b6){

   String s=b6.getText();
   if(b9.getText().equals(" ")){ b9.setText(s); b6.setText(" ");}
   else if(b3.getText().equals(" ")){ b3.setText(s); b6.setText(" ");}
   else if(b5.getText().equals(" ")){ b5.setText(s); b6.setText(" ");}

}
if(e.getSource() == b7){
   String s=b7.getText();
   if(b4.getText().equals(" ")){ b4.setText(s); b7.setText(" ");}
   else if(b8.getText().equals(" ")){ b8.setText(s); b7.setText(" ");}

}
if(e.getSource() == b8){
   String s=b8.getText();
   if(b7.getText().equals(" ")){ b7.setText(s); b8.setText(" ");}
   else if(b9.getText().equals(" ")){ b9.setText(s); b8.setText(" ");}
   else if(b5.getText().equals(" ")){ b5.setText(s); b8.setText(" ");}
}
The last button marks the end of the puzzle, so it should also include a statement that checks whether it has been solved. For that to happen, the pieces must be put in the following order:
1 2 3
4 5 6
7 8 empty
Therefore, the simplest way to verify this order is to check the text on each button.
					if(e.getSource() == b9){
   String s=b9.getText();
   if(b6.getText().equals(" ")){ b6.setText(s); b9.setText(" ");}
   else if(b8.getText().equals(" ")){ b8.setText(s); b9.setText(" ");}

   if(b1.getText().equals("1")&&b2.getText().equals("2")&&b3.getText()
           .equals("3")&&b4.getText().equals("4")&&b5.getText().equals("5")
           &&b6.getText().equals("6")&&b7.getText().equals("7")&&b8.getText()
           .equals("8")&&b9.getText().equals(" ")){
       JOptionPane.showMessageDialog(Puzzle.this,"YOU WON!\n" + "You clicked: " + counter + " times.");
   }
}
You can add a dialog box with a custom message that will pop up when the puzzle is solved. To do that, use the JOptionPane.showMessageDialog() method.
Finally, increase the counter integer and update the label’s text to the new value at the end of the if statements.
					counter++;
counterLabel.setText("Clicks: " + counter);
Your sliding puzzle is ready!
Conclusion
By following this tutorial, you have programmed your own sliding puzzle in Java using simple if statements and some basic functionality of the Swing library. Explore the library’s other features and think of ways to expand your project by adding, for example, a scoreboard, an option to switch between different puzzle sizes, randomization of the shuffle, etc. And don’t forget to upload it to your GitHub profile.
To check out the final code and compare it to yours, click the link below.
If you need any help or advice, leave a comment.
Lesson Topics
- Preparing Variables
- Creating Constructor
- Adding Logic to Action Listener


1 thought on “Making A Sliding Puzzle in Java: Step-by-step Guide [Project Tutorials]”
Pingback: Premium URL Shortener